Road Trip Around Iceland 2015

/
0 Comments
  * I'm not a full time blogger, so forgive me for any grammar and spelling mistakes *

ROAD TRIP AROUND ICELAND 2015

Nearly 4 years ago I remember seeing an image online of some Ice being surrounded by a rushing wave on a black beach. I quickly found out that the location was Jökulsárlón in Iceland.
Iceland has never been on my radar for places to visit, however since becoming addicted to landscapes I quickly found out that Iceland is definitely a must destination for any photographer to visit let alone landscape photographers.
So my key objective since seeing that image was to get myself to Iceland and experience the beautiful landscape it has in abundance.
The ever changing weather conditions, harsh prehistoric mountains, landscapes with a mix of fire & ice makes this place a truly remarkable sight you think only existed in dreams or fantasy fairytale stories.

When my good friend Mark Price, photographer and fellow Instagram buddy contacted me to ask if I wanted to go with him, Ben Green and Jonny Joyce to Iceland for 10 days in a camper van, clearly my reply was urm okay sounds like fun.... YES PLEASE!!!! ;)

Ice on Jökulsárlón Beach

Kit for the trip

So next thing I had to do was to see if my sponsors could help me get kitted out with some new equipment and clothing for this epic adventure. I also took with me the same kit I took to Alberta, Canada. Look at my previous blog for that list.
As always my sponsors were so happy to help. The awesome guys at Cotswold Outdoor supplied me with some amazing kit. I needed some clothing that would keep me warm and dry as I knew the conditions would be challenging and forever changing.

• Mountain Equipment Starlight III Sleeping bag (Sold Out).


The Berghaus waterproof trousers were really good. They were very easy to put on, especially wearing boots. The legs had zips running the full length of the outer side to make it easy to put on and off.
The North Face Peak Jacket was a great final layer to wear. The pockets were perfect to carry so many important things such as lens cloths, filters and my phone.
The Rab Endurance Jacket was my "go to" Jacket. I wore this for most of the trip. So warm and very comfortable.
The Mountain Equipment Sleeping Bag was something I really enjoyed climbing into, perfect for those nights when we didn't have any heat in our camper van.
After my recent trip to Canada I realised that I needed a large holdall and not a hard shell suitcase. I always over pack and my suitcase was taking up too much valuable weight. So this large 140L bag was perfect. I also liked that it had an inner compartment to put all my dirty washing in.
Last and certainly not least, the Petzl Head torch. For a torch that is charged via a USB it really did pack a punch. It was intelligent as it altered its brightness to the changing conditions with an amazing battery life.

Filters

My sponsors Lucroit sent me 3 filters to try out. Filters are a huge part of my photography and help create some amazing images using them.
The one I used the most was the Formatt Hitech Neutral Density (ND) 0.9 Soft Graduated Filter. This was such a great filter. Perfect to help darken the sky and make the clouds more defined and dramatic. With it being a soft grad it didn't show up much if it encroached over a mountain tip like a Hard Graduated Filter would.

The next filter I used was the Formatt Hitech Firecrest IRND ND3.0. A very nice filter but one I dont think I've mastered correctly. When stacked with some more filters it does create more noise than my Lee 10 Stop does but less colour casting. Definitely more practice with this one.

The last filter I got was the Formatt Hitech ND 0.9 Reverse Filter. I've never used a reverse filter before but its always been a filter I wanted to try. It's a filter that is used for sunrises and sunsets. The way it works is the darkest section of the filter starts from the middle and fades as it goes up the filter. This ensures that the darkest part of the filter is over the Sun when its at its lowest. Regrettably I only used this on a handful of occasions but definitely one I will use again and again.  


Tripods & Backpack

My new sponsors Manfrotto were happy to help me and at very short notice. They supplied me with a smaller tripod and backpack.
I've been using Manfrotto since I began my journey into photography, so to have these guys supporting me was a great honour.


I also had my Manfrotto Aluminum 190 tripod with me and the same 498RC2 Ball Head which is the tripod and Ball Head I use most of the time.
The backpack was perfect for what I needed. It held pretty much all my equipment, including:


So as you can see quite a lot to carry. I took all this on the plane as hand luggage. It was very heavy but the backpack felt like it was up for the job. My previous Backpack was a Manfrotto Professional Backpack 30, unfortunately I found this quite uncomfortable to wear on my back as the rubber feet on the base of the bag nearer to my back rubbed against my back and caused sores.
However this bag Manfrotto Pro Light Camera Backpack was one of the best bags I've worn. Comfortable and easy to use. The waist band is a must when the bag is heavy especially if you're walking all the time, it helps distribute the weight from off your shoulders. Also make sure you tuck all loose adjustment straps away, if you don't, when its windy you may get loose straps flicking up into your face (I learned a lesson their...Ouch). 
I also liked how the shoulder straps can be tucked away behind the back cushioned part.
You can also remove one of the shoulder straps to have just one going diagonally across your chest, perfect for when the backpack is lighter.
I also liked the top compartment. It was easy to access my filters, holders and remote from here. However I did think the top part of that compartment would have given me more confidence if it was made with a more rigid shell for better protection. Similar to the Manfrotto Professional Backpack .

The Manfrotto 190 Go Aluminum Tripod wasn't my first choice of tripod I asked for, but at very short notice this was all they could get to me.
It was a very smart little tripod. Compact but still quite heavy. It was sturdy enough to hold my Canon 5D MK III and 70-200mm lens without having to much movement which I was quite impressed with.
However I am more of a quick clips on the legs kinda guy. I find them quicker and easier to use. This tripod had rubber twist locks which are ok, but when it's cold and you're not wearing any gloves, I can find these quite painful for my hands. But this is personal preference. It's a great little tripod to take on mini adventures, strong, reliable, compact and perfect for outdoors.

Overall I was very happy with what Manfrotto sent me. I'm looking forward to working with them more in the future and trying out some more kit.
Bruarfoss Waterfall, Iceland. Manfrotto Pro Light Camera Backpack & Manfrotto 190 Go Aluminum Tripod with the Manfrotto 498RC2 Ball Head
Kirkjufell, Iceland. Manfrotto Pro Light Camera Backpack & Manfrotto Aluminum 190 tripod with the Manfrotto 498RC2 Ball Head


Let the journey commence...

I will do my best to try and post pictures in the order they happened but some might be slightly out. Also this is a general overview of my favourite moments in Iceland.


So once we landed in Iceland if there was one thing I noticed as soon as I stood outside and that was the eggy smell coming from the sulphur in the air. That took a while to get used to especially when you could smell it when using hot water taps in some toilet facilities and showers.

We were picked up from the airport and taken to our Camper Van hire. We were shown around the van and it was at this point we had a bomb shell dropped on us. You can not use the showering facilities inside the camper van as we are still in winter season. Now considering we have been in talks with them for weeks, they never once mentioned that we weren't able to use the shower inside the camper van.
We asked them "where do we shower" and the response was "Camp Sites dotted around Iceland". We felt disappointed as we didn't budget for this, but we had to accept that this would be the only way.
However 1 day in we also realised that most camp sites were still closed and weren't open until May (4-5 Weeks away).
Getting clean seemed like it was going to be more difficult than we anticipated. 4 men sharing in such a small space, we knew being clean was an absolute MUST!!!! HAHA.
We also needed to know where to buy groceries and other items. The website I Heart Reykjavik helped us pinpoint stores around Iceland.
Here is Me, Ben, Jonny & Mark all hyped up and ready to explore Iceland in our Camper Van.
We had a rough guide of places we wanted to visit and this was also extended after our friend and super talented photographer Stian Klo from Lofoten Tours helped add locations he knew we would like.
First on our list was Kirkjufell. Kirkjufell is a 463m high mountain on the north coast of Iceland's Snæfellsnes peninsula, near the town of Grundarfjörður. It's a well photographed location but looks different every time due to the ever changing weather conditions Iceland has.

On the way to Kirkjufell, like anywhere in Iceland, you always find great places to stop and shoot. Me and Ben found this great spot, it was along the side of the road on Highway 54.
Random Stop & Shoot on Highway 54, Iceland.

My settings were:
Aperture: f/14
Exposure: 0.8 Seconds
Focal Length: 24mm
ISO: 100
Edited in Lightroom 5
The sun was going down and we still hadn't arrived at our destination Kirkjufell, so we had to get a wiggle on.We just about made it here in time for sunset. We pulled up into the carpark and we ran with our tripods, cameras and bags to the top of the hill as the light was fading fast. WOW that nearly killed me (note to self, must get fitter) ha. One of the best comps is over looking a waterfall with Kirkjufell in the background.

Kirkjufell, Iceland.
So once I recovered from running up this hill, well I'm telling a lie there, I actually didn't recover until the following morning. Me and Jonny had a cough all night after our lungs got a right pasting with that burst of exercise.
I had to think what was going to be my main focal point, for me it was the mountain Kirkjufell. The widest lens I have is 24mm so I had to make sure I made the most of my composition.
Once I was set up, I knew I wanted to do a slight long exposure to capture the movement of the water. I knew 2-8 seconds would be sufficient in this light and not require dark filters. I didn't want to expose any longer than 8 seconds as that would mean applying more filters and then you're fighting darker exposures and the likelihood of noisy images (Grainy Images).
So my Manfrotto 190 Series tripod was set up, camera attached, 24-105mm lens fitted, remote inserted, my Lucroit filter holder fitted to my lens with my Lee 0.3 hard grad filter fitted and pulled all the way down to act as a full 0.3 filter and stacked with my Formatt Hitech Neutral Density (ND) 0.9 Soft Graduated Filter which was positioned over the clouds and the tip of the mountain.
Even though the mountain is the main focal point I actually manually focused on the ground just on the other side of the waterfall.

My settings were:
Aperture: f/14
Exposure: 6 Seconds
Focal Length: 24mm
ISO: 100
Edited in Lightroom 5

I always take 3-6 different exposures to hopefully capture the right exposure. The image may look ok on the screen on your camera but that is known to lie A LOT!!! It helps to check your histogram to see how your exposure looks. The graph will give you a better idea at how much exposure you need for your next shot. i.e. more or less. Also remember if the light is fading your exposure will have to increase and the opposite for sunrise. If it's getting brighter your exposure will need to be shorter.

After the sun had set we headed to the town next door Grundarfjörður for something to eat and a place to park up with our camper van for the night.
Our camper van parked up in Grundarfjörður, Iceland.
We learned a very harsh lesson that night.
1) Make sure you park into the wind or find somewhere to shelter from the wind so you don't rock about all night like you're on a rough ocean.
2) Park on firm flat level ground so you don't spend most of the night trying to keep yourself in your bed.
3) There is heating in the van for a reason, HEAT. Use it and don't feel you only have to use your sleeping bag and duvet. Even though they kept me very warm, the condensation was quite bad so to have the heating on that kind of eliminated that.
Harsh lesson's and it still took a few days before we really took all these points on board.

The following morning we awoke to fresh snow on the ground and excitedly headed back to Kirkjufell as we knew it would look different now the landscape had changed with the snow.
Camera setup Kirkjufell, Iceland.
Kirkjufell, Iceland.
Same set up as before but with a 0.9 hard grad pulled all the way down with the soft grad placed over the clouds and tip of the mountain. Slightly different settings due to the light being brighter.
My settings were:
Aperture: f/18

Exposure: 16 Seconds

Focal Length: 24mm

ISO: 100

Edited in Lightroom 5

It was now time to head towards one of our next destinations Hveritserkur, Vatnsnes peninsula, in northwest Iceland. Hveritserkur is a stunning rock formation on the beach. The rock has two holes at the base, which give it the appearance of a dragon who is drinking.


We stayed in a town called 
Hvammstangi. It's here we found out we could use the local swimming pool facilities to get showered. After being in Iceland for 2 days we all needed a shower. It really boosted morale, feeling clean and smelling good is a great feeling.

Morale boosted, we set off for Hveritserkur for sunrise the next day. It had snowed overnight and we knew we would have to go on a track that wasn't exactly camper van friendly in the snow. 
We took it slow and managed to get to the car park just as the golden hour was starting. We didn't know exactly how to get down to the beach so we all set off to explore and also at the same time a snow storm hit.
None of us could see a couple of feet in front, so we decided to head back to the van and wait out the storm.
If you've ever been to Iceland then you'll know the weather changes very quickly. As soon as we took our kit off the storm had passed. 
Knowing time was now crucial, we promptly headed back out to look for the route to the beach and where the rock formation was. We now know we took a long route down but never the less we got there.
There was a beautiful morning approaching but also another snow storm. This is why you can see 2 images above. One set up without the storm and another as the storm hit.
Unfortunately Jonny missed this shot as he realised once he set up he had forgotten his camera. Hahaha so Jonny took the long walk back to retrieve his camera from the van.
I shouldn't laugh but I did find this quite amusing ;) 

Once we achieved our objective of shooting Hveritserkur we headed back towards Highway 1 (the main road which circles the whole of Iceland) and set course for a few photography stops towards Arnarstapi. 
                                 
The weather really did give us an Icelandic welcome. With strong gusts of wind and snow storms where you couldn't see a few feet in front, our journey to Arnarstapi took longer than anticipated.

The journey to Arnarstapi may have taken longer than we expected but it was definitely worth it. Arnarstapi was without doubt my favourite place to shoot. The landscape was truly something else. Very prehistoric and like a scene that wouldn't be out of place on Game of Thrones or Lord of the Rings. As soon as we arrived here (just as the sun was setting, AGAIN!) we all split up as we didn't want to have to flex muscles to see who got the best composition spot. When you're with a group of photographers it's inevitable to see someone else's position and think "damn it, they have the best comp" ha. So it can be quite amusing to see who from the group starts walking that slightly bit faster as you approach to hopefully see the best comp lol. 


A great place to sit and watch the drama roll in. I'm definitely a photographer that enjoys drama within an image. If it isn't there then I can be known to edit in a style at where I can bring the drama out. It did feel great to see a landscape/seascape where I didn't need to edit any drama as it was there in abundance.
My settings were:
Aperture: f/14
Exposure: 221 Seconds
Focal Length: 24mm
ISO: 100
Lee Big Stopper
Hitech 0.9 Soft Grad
Edited in Lightroom 5


I was in my element walking along the cliff watching this magical place. We all split up here as we knew there was much to see.
My settings were:
Aperture: f/14
Exposure: 2 Seconds
Focal Length: 24mm
ISO: 100
Hitech 0.9 Soft Grad
Edited in Lightroom 5


It was here in Arnarstapi we found out that the Northern Lights were going to be out by using an app called Aurora Forecast that showed you how intense the lights will be and this awesome Icelandic Weather Website which we used religiously to help navigate to where the best weather will be. Take note though because the weather changes quickly, more than 24hrs predicted can be incorrect. That's not the websites fault, that's just how the weather is. We found 95% of the time the readings were correct and very helpful.

After shooting the amazing views in Arnarstapi during sunset we headed on back to the camper van to wait for the Aurora to appear. We said we would take it in shifts to stay awake to look for the lights. Because I was the only one to have ever witnessed the lights I took first shift.
The guys started to unpack and I went outside into the dark to have a look. If the light's aren't that strong then it's useful to set your camera up on a high ISO for about 20-30 seconds exposure. If the light's are there your camera will pick it up. As I placed my tripod down I looked up and BAM!! the lights were above putting on an amazing display.
I rushed back inside and said guys don't get too comfy, the lights are above and looking pretty spectacular.
We all grabbed our gear and rushed out of the van whilst getting stuck in the door as we were all keen to shoot this magical event and we didn't know how long it would last for.

We must have shot loads of pics with different comps. This was our first time and we knew shooting such an event would prove difficult as you have to work with high ISO's to get the best out of the lights and this causes a lot of noise.

We were all like big kids looking at their first firework display with sounds like Ooooo, Arrrrrrr, look look over there, wow.
Mark in particular was so happy to witness the lights and to shoot them. Personally, it was a great feeling to see a friend so overwhelmed with happiness by nature's beauty above.


Here's me capturing Jonny above shooting the magical lights. The clouds as always added a lot of drama to this colourful night sky.
My settings were:
Aperture: f/6.3
Exposure: 30 Seconds
Focal Length: 24mm
ISO: 2500
Edited in Lightroom 5

After shooting the lights until 03:00am we headed off back to the camper van for some much needed shuteye. I couldn't help but take one last picture before going to sleep and what better focal point to use, than the camper van.
My settings were:
Aperture: f/6.3
Exposure: 30 Seconds
Focal Length: 24mm
ISO: 2000
Edited in Lightroom 5

Next morning we finally awoke to carry on our journey. But as it was such an epic night we decided to stick around and do some editing. Not a bad place to chill and edit some pics and enjoy breakfast ;)

Top picture is me eating some cereal with the fantastic Arnarstapi cliffs in the background.
Below is Jonny and Ben (looking ruined) at the breakfast table.

Editing now finished we needed to carry on with our epic journey. Next stop Vik.

We arrived at Vik under the cover of darkness and in extremely bad weather. We found somewhere sheltered to park up for the night as we knew we needed a good night sleep for sunrise.
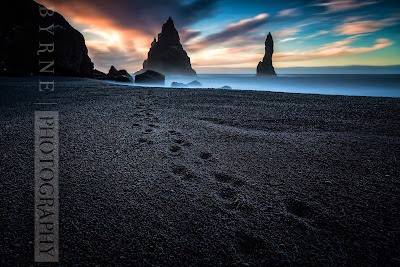
Morning broke, it looked like it was going to be beautiful. So we slowly made our way to Reynishverfisvegur in very windy conditions and roads that still had a lot of snow on. The sun was rising and the waves from the North Atlantic ocean were very fierce. So much so Jonny, Mark and Ben were all hit by the unpredictable waves. I felt so lucky not to have the same thing happen to myself.
When you arrive at Reynishverfisvegur, you can see 2 fantastic rock formations protruding out of the ocean. These were going to be my focal points within my shot.
I seemed to be moving slower to everyone else as I was taking in more of this amazing view. This benefited me as Mark and Ben had walked in front and unknowingly created a great leading line of footsteps within my shot. This would definitely make the shot more appealing as leading lines always draw people into the image.
My settings were:
Aperture: f/8
Exposure: 100 Seconds
Focal Length: 24mm
ISO: 100
Edited in Lightroom 5

Mark was in the middle of the shot but as it was a long exposure and he wasn't in the frame for to long, he ended up disappearing from the final image. This is something to think about when doing long exposures. If someone walks into the shot, don't worry too much as if they move out they could disappear from your final result.
The main focal points were I guess 2 things, the rocks and the footsteps. It was the footsteps I focused on and I made sure that the rocks protruding from the sea were centred within the frame. This gave a good balance to the shot.
As the sun appeared from the horizon behind the clouds it produced some stunning colours. My exposure had to be spot on for this as I wanted enough to expose the footsteps on the black beach but not too much to blow out the sky. To help me I used my Lee 1 x Big Stopper and my Formatt Hitech Neutral Density (ND) 0.9 Soft Graduated Filter.
Now I cant express how hard this shot was to take because of the severe gales. It may not look it but we were being blown all over the place and to keep my tripod secure and still for a long exposure was very testing. Thankfully my Manfrotto Aluminum 190 tripod was up for the challenge.

If there was still one thing that I found fascinating and that was snow on the beach. It's something I've never seen in real life before. I had to shoot a From Where I Stand Shot.

After we shot Reynishverfisvegur we decided to head further east along the south coast towards one of the places Stian Klo told us about, Fjaðrárgljúfur. A beautiful canyon not far off the main route. It was via a smaller 'F' road which in winter are predominately used by 4 wheel drive vehicles and not a 2 wheel drive camper van. But we tried and failed. Thankfully we didn't get stuck for long and got ourselves out.
We parked up on some hard standing just off the road and we decided to walk the 2-3k to the canyon. Mark & Jonny stayed behind as they wanted to dry out after being soaked by the waves at Reynishverfisvegur.
After a 20-30min tab (very fast walk) we arrived at the canyon. Oh I didn't mention, Mark works in London and Londoners are VERY fast walkers. I live outside London so I like to walk slower and take in everything I see.

It was still very windy so we had to be very careful not to fall off this stunning canyon.
I couldn't stand here for too long as I was slightly exposed to the gale force weather. But here I am wearing my Manfrotto Pro Light Camera Backpack & The North Face Mens Peak Guide Jacket from Manfrotto & Cotswold Outdoor.

Next destination was Jökulsárlón for sunset. As we like to leave it until the very last second we just managed to arrive as the sun was setting. Can you see a pattern here? (always late) lol. Thankfully Iceland's 'Golden Hour' is more like Golden 2-3 hours. We found that the colours seem to hang around a lot longer in the sky in Iceland than anywhere else we've traveled to in the world.

We parked up in one of the car parks around Jökulsárlón and proceeded over the little hill towards the Ice lagoon. I wasn't happy with my first composition so I quickly got into the camper van and drove to the other side of the Lagoon. A lot better comp and so glad I did. The sun was a fiery sunset and with the ice in the lagoon it captured the Fire & Ice which is what the island is famous for.
My settings were:
Aperture: f/16
Exposure: 1/10 Second
Focal Length: 24mm
ISO: 100
Edited in Lightroom 5
Filters used were Formatt Hitech Neutral Density (ND) 0.9 Soft Graduated Filter & Lee 0.6 Hard Grad pulled down to just the top of the image to darken the top of the clouds.
We loved the different range of sizes in the ice that were scattered along the beach. This place was truly amazing. The glacier is just off to the right of this image, the ice breaks away creating icebergs in the lagoon, that then move down an opening to the sea where they drift out before being swept on to the beach.
My settings were:
Aperture: f/4
Exposure: 1.8 Seconds
Focal Length: 28mm
ISO: 640
Edited in Lightroom 5

It did make it rather dark and in hindsight I probably would have changed this setup to not be as dark with the filters on. The wind was that bad I had to make sure once I set up, I wouldn’t change it or not as often as it’s difficult to do when the winds are as strong as they were.
Because it was quite dark with the filters on, I made my aperture as wide as it could go f/4 and changed my ISO to 640. This looked like it was good enough to do what I wanted to do.
The end results came out a little noisy than I wanted but overall I was still very happy with it.
Just means I need to go back and do it all again after learning from this experience lol
My settings were:
Aperture: f/8
Exposure: 1/6 Second
Focal Length: 40mm
ISO: 100
Edited in Lightroom 5
I only used the Formatt Hitech Neutral Density (ND) 0.9 Soft Graduated Filter for this shot as it was still reasonably dark to get away with just a grad.

Another place we were desperate to go to was one of Iceland’s most iconic & haunting photography locations. The United States Navy Douglas Super DC-3 airplane which was forced to land on Sólheimasandur’s black sand beach in the south of Iceland after experiencing severe icing on Saturday Nov 24, 1973.
Luckily all crew members survived the crash, but the airplane’s fuselage was abandoned. Now it’s become a photography dream location.
If you need directions to get there then click on this link as it's not the easiest of places to find and you can drive by without knowing.
My settings were:
Aperture: f/22
Exposure: 200 Seconds
Focal Length: 24mm
ISO: 100
Edited in Lightroom 5
I used 3 filters here Lee Big Stopper, Lee 0.9 Hard Grad pulled all the way down and a Formatt Hitech Neutral Density (ND) 0.9 Soft Grad pulled down to just covering the clouds and a bit of the planes fuselage. Because it was the middle of the day and the sun was very strong. I wanted a long exposure to get the clouds looking all whispy as they were captured moving across the sky. This adds great drama to the shot, as its already quite haunting due to it's nature.

Mark had a place he wanted to go to from the beginning, Stokksnes. Later to be renamed by us "STUCKsnes".
We drove there with plenty of time to spare. I know amazing right? haha. We parked up on a hard standing next to The Viking Cafe. It was closed due to it still being winter. There was a long gravelled road probably about 1-2k which turned into sand. We walked down here to recce the area and look for compositions before the sun set's so we wouldn't be rushed like we have been for pretty much most of the trip.
On our way back we were stopped by a local farmer who said we have to pay to proceed down this road. Not sure if it was a con we reluctantly paid a small amount in a box that was left outside a cafe. I've learned since then that it is illegal for this guy to charge us but as it was such a small amount each we actually didn't mind paying. Plus it was a location Mark was desperate to shoot and after viewing it ourselves I think we all were.

We decided that we were going to take our camper van down the 1-2k dirt track and park up just before the soft sand started.

The sun started to go down and we began our short journey towards the sand dunes at the end off the dirt track. Mark asked how far should we go down and I told him stop and turn before the light sand started. But whatever he does stay on the dark sand to turn as it was firmer for our vehicle. As soon as I said that Mark turned the vehicle onto the LIGHT sand which was soft and deep. NOOOOOOOO!!!!!!! we came to an abrupt halt as our camper van wheel span in the sand. MARRRRRRRRK What You Doooooooing!!!!

We were well and truly stuck. The sun was setting with a stunning golden colour which was shinning all over the sand dunes.
Mark wasn't in any mood for jokes as he was disappointed with himself.
Now what do we do? Do we try and dig our way out or do we shoot the sun setting and come back to it when it's dark.
We decided on the first one.

We tried digging our way out but it was proving to be impossible as we just got deeper and deeper.
We all decided to give up and shoot the last bit of the sunset as we wont be here again or at least not for a while.
Ben volunteered to go with some tourists to see the local farmer to give Mark the opportunity to shoot his No1 location. Thanks Ben ;)

Me Jonny and Mark started to shoot various comps but you can see Mark wasn't feeling it, and when you're not in the mood you can struggle to be inspired no matter where you're shooting.
Mark just wanted to rectify his mistake by getting us unstuck.
Ben returned with no farmer. Probably in the pub with our money we generously donated.
Mark phoned for help to a local recovery service and it came about 2 hours later in a 4x4 truck. They got out of their vehicle and took one look at ours and smirked. It was at this point we all moved away from Mark whilst coughing and pointing at him lol.
Anyway within 20 minutes we were free and the recovery guys had a good laugh at our expense, well MARK'S expense. We all had to contribute to a fee of about £60, Totally worth it, but in Mark's defence he did choose a great spot to get us stuck.

Some wise words of advice, if a sign says 4x4 only, believe it, or just don't let Mark drive hahaha. He did take the ribbing we gave him very well for the rest of the trip though.


OK I'm going to finish off this blog with a picture of me enjoying the view at one of the many stunning waterfalls in Iceland. It's also one of the most famous one's, Skógafoss. We did stop off at many waterfalls, check out my Instagram or Facebook page to see more images of my trip to Iceland.
My settings were:
Aperture: f/20
Exposure: 0.8 Seconds
Focal Length: 60mm
ISO: 100
Edited in Lightroom 5
A spectacular waterfall. The spray was proving difficult so I had to shoot this a little way back. I had Ben take this for me. It was around 07:30 in the morning and Ben had only been asleep for a couple of hours as he was up doing star trails. So thanks Ben.

I used no filters here as it was quite a gloomy morning, so 0.8 seconds was a perfect exposure before blowing out my shot.

This image captures my emotion I felt for the entire trip. Happy, excited and feeling so lucky to be there. Iceland was everything I expected it to be and much much more.
I can't say it enough, but everyone should add this country to their list. When you do visit you'll totally understand why if my images haven't done that already.

Me and #beardedtogs crew (this is what we called ourselves) are already talking about revisiting Iceland next year as we still didn't shoot everything we wanted to shoot. So there is definitely unfinished business here.
It was a very tiring trip and towards the end of the 10 days we all felt it. It was proving to be difficult to stay motivated because of the long nights, early starts and over 3000k's travelling around Iceland.
But we all agreed we made the most of it.

I would like to say a big thank you to Mark, Jonny and Ben for making this trip one of the best if not the best trip I've ever been on. We had so many proper belly laughing moments that still tickle me today.

Until we meet again my friends.

Last but definitely not least. A MASSIVE THANK YOU to my sponsors
Your support means a lot!

Until My Next Adventure!


You may also like

Total Pageviews

Copyright of B Y R N E | PHOTOGRAPHY. Powered by Blogger.

Followers

Sponsors

Sponsors